Summary
<<briefly describe the configuration process outlined in this guide>>
<<for In this example we will add a package to our sub-account created in Child Account Creation Example.
For additional details on the fields presented on this screen see the the [[screen help link]] guide>>
Prerequisites
<<configuration that must be done prior to following this process. E.g. ‘Services need to be configured’>>
Process
step 1 to configure this entity
step 2
…
Next Steps
<<documentation team task: link to next configuration article>>
Related Guides
<<documentation team task: link to API guide which covers the same config process>>
<<documentation team task: link to Data Import guide which covers the same config process>>Adding Packages to Accounts guide.
Prerequisites
You need to have at least one package created in the product catalog with the ‘Active’ checkbox enabled
The package you are adding to the account must be configured with the same currency that the account is set to
Process
Log into the LogiSense Billing application
In the search box at the top of the page, leave the Search Filter to Account and then enter the name of the account you wish to add the package to. Select the account from the list and then click the arrow button to go to the accounts overview page
Click on the Profile menu option
You will be taken to the Account Packages screen. Here click the
 icon to add a package to the account
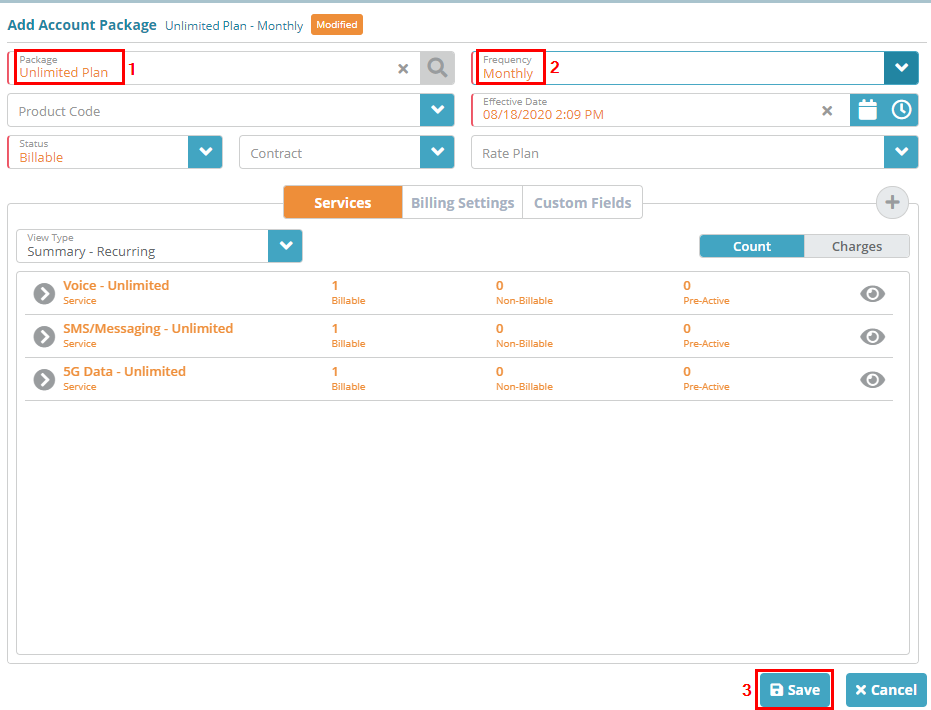
In the Package field start typing the name of the package you want to add and select it from the list when the auto complete displays it. Under Frequency select the package frequency you wish to add
Click Save to add the package to the account
Result
You will now see the package in the “Account Packages” list for the account
Account / Profile / Packages
...
You can view key information on the Account Packages screen (described below the image). For a full field description refer to the Account Packages Screen guide.
...
a) Next Bill Date: this is when the package is scheduled to bill next
b) Status: here you can toggle the package status between your various status types (e.g. Billable, Non-Billable, etc.)
c) Effective Date: when the package becomes effective from a billing perspective
d) Charges tab: shows you the charges on the account-services within the account-package
e) View Type: allows you can toggle between viewing recurring charges, one time charges and pricing details. When Pricing is selected you will be able to modify the charges for the services within the package and also apply discounts for a period of time that you specify
Next Steps
Once account-packages exist on an account you can now bill the account. See the Billing an Account Example guide for an example


