Summary
Accounts are segregated into bill groups by the class of account (e.g. partner, reseller etc.). A account’s bill group is selected when a new account is created.
...
Log into the LogiSense Billing application
Click on Setup, Finance and then Billing
Under Billing settings, click on the Bill Group tab
Under the Bill Groups heading, click the
 icon to add a new bill group
Under the Add Bill Group heading, fill out the required fields (marked with the redleft border)
Enter the bill group Name (e.g. Test)
Enter 1 for the Bill Day
Select an Invoice Delivery, this specifies the invoice delivery settings to use
If desired, enter an Invoice Render Threshold Amount (e.g. if you specify $20 the invoice will not be generated until the total invoice charges meet or exceed $20)
Select the Invoice Due Date based on as Account Bill Date. This option uses the account bill date along with the payment terms configuration to determine the invoice due date. For instance, if the account's bill day is the 1st and the payment terms configuration is set to Net 20, then the invoice due date will be set to the 21st
Select the Invoice Date Based On as Account Bill Day. This will configure the invoice date to be based on the bill day of the account
When the Invoice Date Based On field is set to ‘Account Bill Day’ the Account Bill Day Option field will be configurable. Select Current Period in this field, this will set the invoice date as the 1st of the current month (if the account bill day is set to '1')
If you have already configured bill runs you can select one or more of them in the Bill Run(s) To Add drop down list. When a bill group is connected to a bill run the accounts that are in the bill group will be billed when the associated bill run is executed
Click Save to add the new Bill Group
...
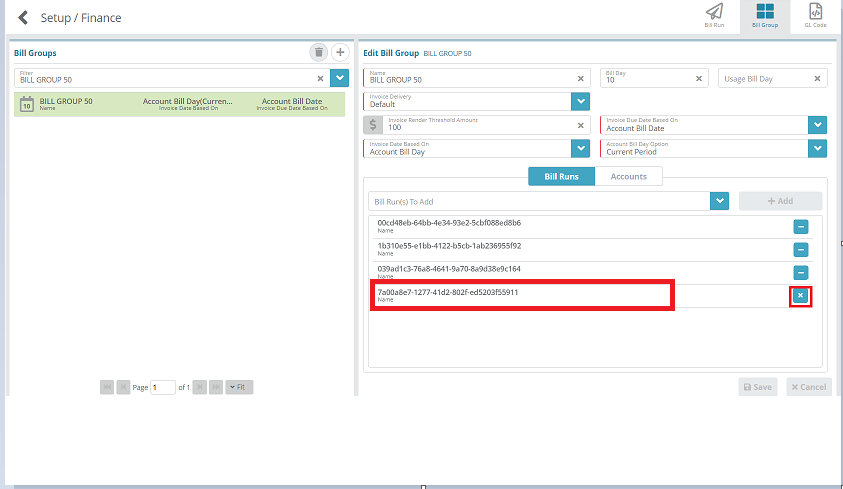
Under the Bill Groups heading click the bill group you wish to edit
Under the Edit Bill Group panel ensure the Bill Runs tab is selected and locate the bill run you wish to remove. Clicking the
 button followed by the
  button to the right of the bill run will flag it as an item to be removed
The bill run will appear to be crossed out (staged for removal). Repeat the process to mark other bill runs for removal if desired
Click the Save button to commit the changes and remove the bill runs from the bill group
Next Steps
Optional: Bill Runs need to be setup and associated with a bill group in order to bill the accounts that are under a bill group. This step can be performed later when you are ready to bill an account if desired. See the Bill Run Configuration Example article for an example of how to configure bill runs
Optional: If you utilize General Ledger codes you can configure these now or at a later time. See the General Ledger (GL) Code Configuration Example article for a configuration example
You have now configured the system to the point where the products you wish to sell can be setup. The first step is to setup service types which are used when configuring services. See the Service Type Configuration Example for an example of how to setup service types


