Summary
Bill groups comprise a collection of accounts which are all billed alike (billed on the same day, using the same invoicing configuration, etc.). You can setup as many bill groups as you require, grouping accounts under bill groups by more than just their account type (for instance, you could setup one bill group for credit card customers and another for ACH customers).
A customer's bill group is selected when a new customer account is created. The bill group that is specified on existing accounts can be changed, however accounts which are not invoiced for subscription and usage charges will have the bill group option greyed out (the bill group settings of the account(s) being invoiced will be used in this scenario).
Prerequisites
An invoice delivery configuration needs to be defined before bill groups can be setup.
Process
1. Log into your Logisense Billing application
...
Under the Bill Groups heading, click the bill group you wish to edit
Under Edit Bill Group ensure the Bill Runs tab is selected and then click inside the text field labeled Bill Run(s) To Add. As shown in Fig-4, BILL GROUP 50 is selected and clicking inside the text field labeled Bill Run(s) shows list of Bill Runs that can be added.
Fig-4
In the list that appears check off the bill runs you wish to add to the bill group
Click the Add button to the right. As shown in Fig-5, A Bill run is selected by clicking on the checkbox.
Fig-5
Click Save to commit the changes. As shown in Fig-6, Bill Run selected in step 4 will be added once Save is clicked.
...
Under the Bill Groups heading, click the bill group you wish to edit
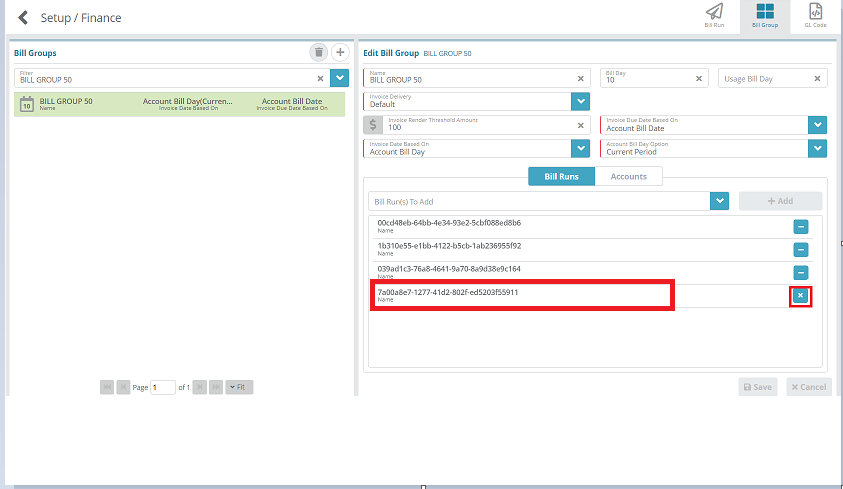
Under Edit Bill Group ensure the Bill Runs tab is selected and then click the button shown below to remove from the bill group. As shown in Fig-7, the highlighted Bill Run is selected to be removed.
Fig-7
The “X” button will appear against the Bill Run selected for deleting as shown in Fig-7, click it to confirm that you wish to remove the bill run and the bill run you selected to delete will appear crossed out in the list as shown in Fig-8.
Fig-8
Click the Save button to commit the removal of the bill run. The selected Bill Run will be removed.
Next Steps
<<documentation team task: link to next configuration article>>
Related Guides
<<documentation team task: link to API guide which covers the same config process>>
...


