...
3. Under Billing settings, Click on Bill Group.
...
The Bill Group Panel
The information in this panel reflects the currently selected bill group. From here you can change bill group details (fields will display a red left border if a value is required and purple text if the field is read-only and cannot be modified).
...
Under the Bill Groups heading, click the add icon
Under the Add Bill Group heading, enter the bill group details (see the edit bill group panel section above for details on each field)Click Save.
For e.g. as shown in Fig-1 enter the bill group name as BILL GROUP 20, ‘Bill day’ as 1, ‘Invoice Delivery’ as Default, ‘Invoice Render Threshold Amount’ as $100, ‘Invoice Due Date based on’ as Account Bill Date, ‘Invoice Date based on’ as Account Bill Day, 'Account Bill Day Option' as Current Period.
Select as Bill Run and Click on Add to add the Bill Run.
Click Save to add the new Bill Group.
...
Fig-1
Editing Bill Groups
Under the Bill Groups heading,t click the bill group you wish to edit. For e.g. Bill Group “BILL GROUP 50” is selected for modification as shown in Fig-2.
Under the Edit Bill Group heading, modify the bill group details (see the edit bill group panel section above for details on each field)for e.g. Bill Day is modified to 10 as shown in Fig-2.
Click Save when finished making changes and changes will be saved.
...
Fig-2
Deleting Bill Groups
Note: you cannot delete a bill group if it is in use. If you need to delete a bill group that is in use you will first need to change all accounts under the bill group to use another bill group and also remove the bill runs that have been added to the bill group
Under the Bill Groups heading, select the bill group you wish to delete. For e.g. Bill Group name “BILL GROUP 20” is selected to be deleted as shown in Fig-3.
Under the Bill Groups heading, click the bin icon
On the confirmation dialog that appears select Yes. The selected Bill group will be deleted.
...
Fig-3
Adding Bill Runs to Bill Groups
Under the Bill Groups heading, click the bill group you wish to edit
Under Edit Bill Group ensure the Bill Runs tab is selected and then click inside the text field labeled Bill Run(s) To Add. As shown in Fig-4, BILL GROUP 50 is selected and clicking inside the text field labeled Bill Run(s) shows list of Bill Runs that can be added.
Fig-4
In the list that appears check off the bill runs you wish to add to the bill group
Click the Add button to the right. As shown in Fig-5, A Bill run is selected by clicking on the checkbox.
Fig-5
Click Save to commit the changes
...
. As shown in Fig-6, Bill Run selected in step 4 will be added once Save is clicked.
...
Fig-6
Removing Bill Runs from Bill Groups![]()
Under the Bill Groups heading, click the bill group you wish to edit
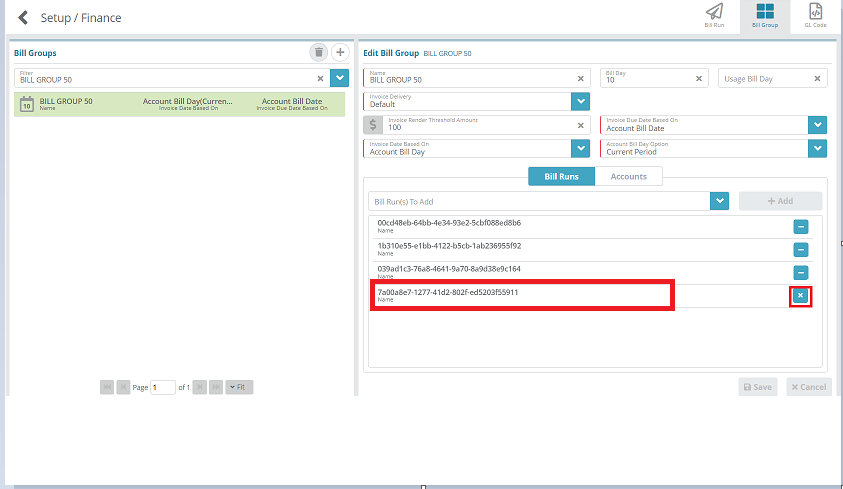
Under Edit Bill Group ensure the Bill Runs tab is selected and then click the button if you wish the button shown below to remove from the bill groupThe button will appear. As shown in Fig-7, the highlighted Bill Run is selected to be removed.
Fig-7
The “X” button will appear against the Bill Run selected for deleting as shown in Fig-7, click it to confirm that you wish to remove the bill run and the bill run you selected to delete will appear crossed out in the list as shown in Fig-8.
Fig-8
Click the Save button to commit the removal of the bill run. The selected Bill Run will be removed.
Next Steps
<<documentation team task: link to next configuration article>>
...


