...
While on an opportunity, click on the Opportunity Product Name
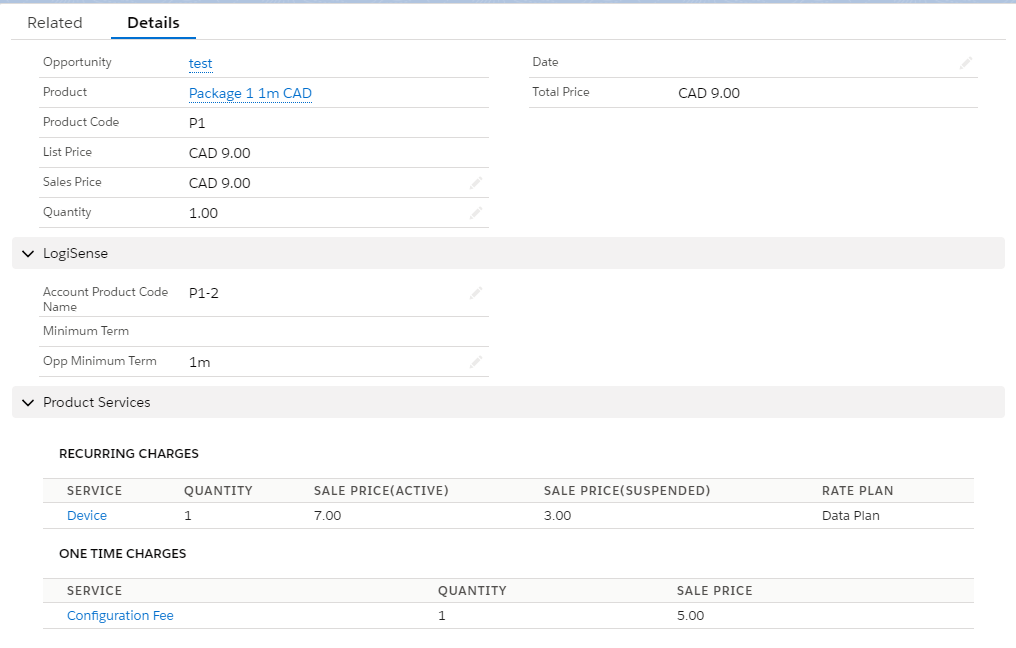
You’ll notice that the standard opportunity product screen has been slightly modified with a few additional fields and a new section, Product Services.
Let’s go through the new fields first:Account Product Code Name - a read-only field that is auto-generated using the product code, followed by a dash and incremental number. This is a unique identifier for this opportunity product. It allows sales reps to attach the same product to the opportunity with different pricing or terms so that when the product is ordered by a customer in the future they can select the correct one
Minimum Term - populated with the package contract set in LogiSense billing
Opp Minimum Term - allows your sales reps to override the default Minimum Term for this opportunity product
Unlike native Salesforce where your sales reps would adjust the Sales Price on the Opportunity, custom pricing of a product is done from within the Product Services section of the Opportunity Product screen. This section is broken out between Recurring Charges and One Time Charges depending on how the package was configured.
Click on the Service name within the Product Services section for the one you would like to adjust pricing for. The pricing screen is broken into a few sections:
Opportunity Product Service Detail - lists the opportunity name, opportunity product, quantity or number of this service under the product and the product service you are currently viewing
Allowance - if there is a usage bucket configured on the service its details will appear here including the name of the bucket, its recurring frequency, followed by the allowance
Recurring Charges - allows the user to override the list price for each status
Transition Charges - allows the user to override the list price for each transition charge associated with the product service
Rate Charges - allows the user to override the list price for any usage rates that are associated with the product service
Click Save once all edits are complete
Repeat step 2-3 above for any other product services you would like to adjust pricing for
Proceed throughout your regular process of advancing the opportunity through its stages
...
While on an Order, click on the Order Product Name
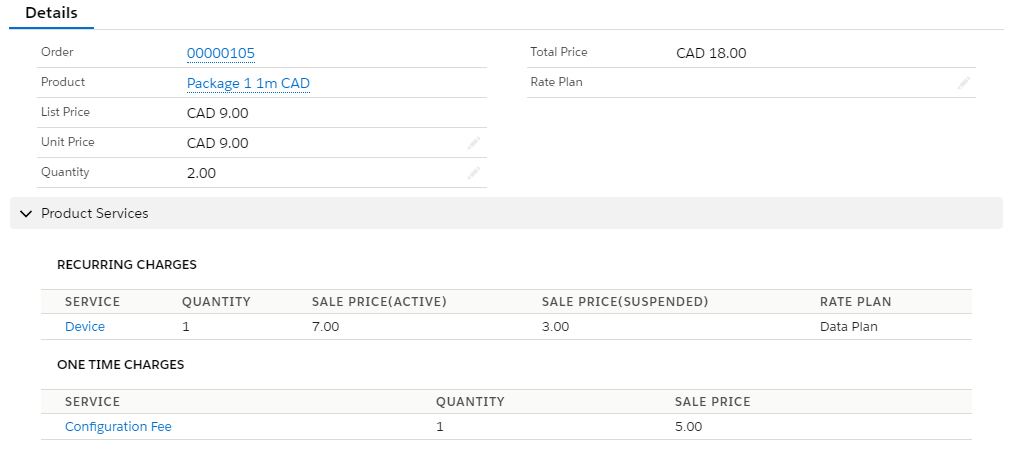
You’ll notice that the standard order product screen has been slightly modified and include a custom field called Rate Plan. This is a picklist field that allows you to select a different rate plan (usage rates) for the order product than the one currently associated with it (if any).Click on the Service name within the Product Services section for the one you would like to adjust pricing on. The pricing screen is broken into a few sections.
Order Product Service Detail - lists the order Name, Order Product, Quantity or number of this service under the product and the Order Product Service you are currently viewing
Recurring Charges - allows the user to override the list price for each status
Transition Charges - allows the user to override the list price for each transition charge associated with the product service
Rate Charges - List of all the rate charges associated with the service
Click Save once all edits are complete
Repeat step 2-3 above for any other product services you would like to adjust pricing for
Proceed throughout your regular process of advancing the Order through its stages
...


